|
Important: This section is for entering and allocating insurance payments manually in axiUm. To handle insurance payments automatically, see a Manage EDI Remittances.
Insurance payments are made by insurance companies on behalf of a patient or guarantor that has coverage so that the patient does not have to pay the entire cost of their treatment. Depending on the type of coverage and the procedures completed, the insurance company may cover part, all, or none of the cost. After services have been rendered to a policy holder or their dependent and submitted within a claim, the insurance company sends back payment to pay for their portion of the charges and an Explanation of Benefits (EOB) document, outlining how much money should be applied to each treatment in the claim.
Tips:
-
A claim may contain multiple treatments for a single patient.
-
Insurance companies often send a bulk payment to cover multiple claims and multiple patients. An insurance payment is handled the same regardless of how many patients and treatments are included on a single payment.
-
Even though the full charge amount is sent to an insurance company on a claim, a company may pay a partial amount or no amount at all. The EOB will be used to allocate the insurance payment amounts to the correct treatments.
Examples: The coverage template is out of date or the insurance limits were reached.
-
Insurance companies entered into axiUm may be parent or child companies. A parent company is a larger company that is a collection of child companies. Claims can only be submitted to child companies, but you may receive payments from parent companies.
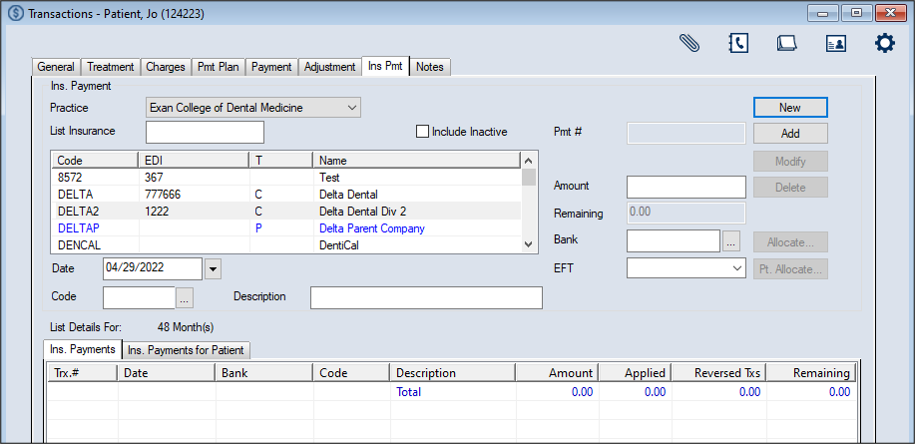
Once received, insurance payments are added from the Transactions module > Ins Pmt tab and allocated as necessary. Allocation identifies which patient record the payment will be applied to as well as which treatments and charges.
 Enter Insurance Payments Enter Insurance Payments
- Open the Transactions module and click the Ins Pmt tab > Ins. Payments sub-tab.
-
Click New.
- Search for and select the insurance company.
Note: The full list displays if the Load all Ins. companies in list checkbox is selected in the Transaction Options window > Payment Options section. For information, see Customize Transactions.
-
Enter the first character(s) of the company you are searching for based on the column headings and click the applicable heading to sort.
Tip: You can enter an underscore (_) to display all results within the column.
Note: You can select the Include Inactive checkbox to include inactive insurance companies in the search.
-
Select a listed insurance company.
-
Complete the Ins. Payment fields as necessary and click Add.
Note: Up to two custom fields may also be configured for use by your institution. If configured, they display below the Bank field.
Ins. Payment fields
| Practice
|
This defaults to the workstation's default practice.
If necessary, select another practice from the drop-down.
|
| Date
|
This defaults to the current date.
If necessary, select another date from the calendar drop-down.
|
|
Code |
Enter the payment code or click the ellipsis to select from the Payment Codes window.
|
| Description |
This field displays the description of the selected code.
Tip: Include any identifying numbers for the payment, such as the check number, to assist with auditing.
|
| Pmt # |
This read-only field displays an axiUm-generated payment number that is assigned when you click the Add button.
|
| Amount |
Enter the dollar amount of the insurance payment.
Note: If adding a $0 payment, leave the default 0.00 value.
|
| Remaining |
This read-only field automatically displays the amount remaining to be allocated when you click the Add button.
|
| Bank |
Enter the bank code that identifies where the payment was processed or click the ellipsis to select from the Bank Codes window.
Note: This field is only enabled if the Affect Bank Deposit checkbox is selected.
|
The record displays in the list view in green text to indicate it is not allocated.
Important: At this point the payment has been entered but is not allocated anywhere. To allocate the payment, see .
Allocate Insurance Payments
Once an insurance payment has been entered, it must be allocated to specific treatments.
Important: In many cases, even though the full charge amount was sent to an insurance company on a claim, they do not pay the full amount. In some cases, they may deny the claim and pay $0.
The EOB is used to allocate the insurance payment to the correct treatments in the correct amounts. The EOB details may indicate one of several outcomes for each charge on a claim:
- The insurance company paid the expected amount.
- The insurance company paid less than the expected amount.
- The insurance company paid more than the expected amount.
However, even denials and partial payments must be allocated in order to enter EOB details to create secondary claims, transfer balances, or write off balances when necessary.
Important: Only one person should allocate an insurance payment at a time. If multiple people allocate the same payment at the same time, data issues may occur and require a call to axiUm Support.
Tip: After allocating insurance payments accurately, you can generate the Insurance Aged Balances report to list which claims and treatments have not been paid.
There are two ways to allocate an insurance payment in axiUm:
-
Use the Allocate… button to view and select charges from a list of all outstanding charges on claims for that specific insurance company.
Note: This is the most commonly used method. It allows you to view all outstanding charges owed by the selected insurance company. If the insurance company is a parent company, all claims for the children insurance companies under that parent will also be listed.
-
Use the Pt. Allocate… button to view and select charges from a list of the claims for only the currently selected patient.
Note: Insurance companies rarely send payments for a single person. This method is mainly used if you need to unallocate/re-allocate an insurance payment after it was already allocated.
To allocate an insurance payment:
- Open the Transactions module and click the Ins Pmt tab > Ins. Payments sub-tab.
- Search for and select the insurance company.
Note: The full list displays if the Load all Ins. companies in list checkbox is selected in the Transaction Options window > Payment Options section. For information, see Customize Transactions.
-
Enter the first character(s) of the company you are searching for based on the column headings and click the applicable heading to sort.
Tip: You can enter an underscore (_) to display all results within the column.
Note: You can select the Include Inactive checkbox to include inactive insurance companies in the search.
-
Select a listed insurance company.
-
Review the listed payments.
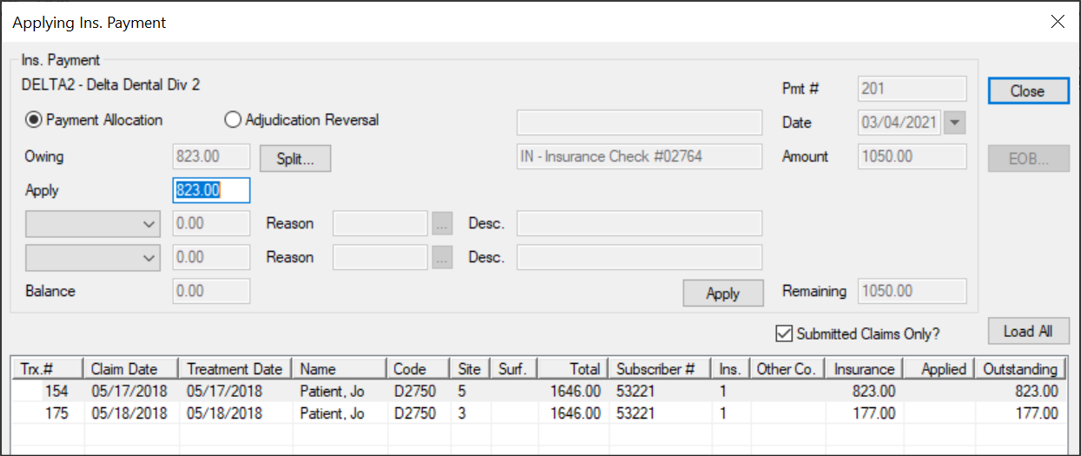
- Select a listed payment and click Allocate… to display the Applying Ins. Payment window.
Note: The available fields display differently depending on which button is used to open the window.
-
Select a listed treatment/charge.
Note: To include unsubmitted claims in the list, deselect the Submitted Claims Only? checkbox.
-
(Optional) To review patient/insurance split, click Split… to display the Treatment Split window and review the fields as necessary.
-
Complete the following:
-
Modify the Apply field to the amount being paid by insurance.
Notes:
-
If allocating a $0 payment, leave the default 0.00 value.
-
If insurance overpaid, you need to rebill the treatment.
-
If there is a remaining amount, transfer or write off the amount as necessary.
Important: The Balance field should display 0.00 when you apply all transfers and write offs.
The payment amount displays in the Applied column next to the outstanding treatment/charge(s).
-
If necessary, repeat Step 7 until the entire payment is allocated.
-
Click EOB… to display the Explanation of Benefits (EOB) Details window.
Note: This button is only enabled if the selected record has an EOB attached automatically to it via the EDI Remittance module or if you have already allocated an insurance payment to the record.
-
Review or add the EOB information as necessary.
-
To perform another task, complete any of the following:
Select Patients
When necessary, you can quickly select a patient using a listed treatment/charge.
-
Select a listed record, right-click, and choose Select Patient.
View Patient Information
When necessary, you can quickly access the patient’s record for whom a treatment/charge is for.
-
Select a listed record, right-click, and select Patient Info… to display the Patient Info window.
- Review and modify the fields as necessary.
View Claim Submission History
-
Select a listed record, right-click and select Claim Submission History… to display the Claim Submission History window.
- Select a listed record and review the fields as necessary.
-
(Optional) To print, click Print Copy or Reprint as necessary.
Display Allocations
Allocation identifies which patient account a payment will be applied to as well as to which treatment/charges.
Note: If there are separate insurance payment allocations for the same record from the same insurance check, axiUm adds these and displays them as a single item.
-
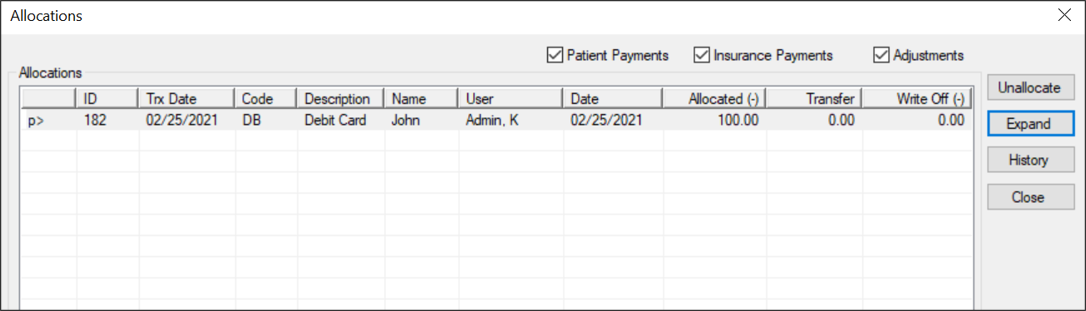
Select a listed record, right-click and select Show Allocations to display the Allocations window.
-
(Optional) To filter the listed records, select any of the following checkboxes:
-
Patient Payments
-
Insurance Payments
-
Adjustments
-
Review the listed records.
-
(Optional) Complete any of the following:
-
To separate the payment and adjustment amounts by line, select a record and click the Expand button.
-
To view the history of an allocation, select a record and click History.
-
To unallocate a record, select a record and click Unallocate.
Edit Treatment Split
-
Select a listed record, right-click and select Edit Treatment Splits… to display the Treatment Split window.
- Review and modify the fields as necessary.
- Click OK.
Add Sticky Notes
Sticky notes are used in axiUm to store and display small pieces of information and can be used as reminders for you or other users.
-
Select a listed record, right-click and select Add Sticky Notes… to display the Stickies window.
- Enter the note contents.
-
(Optional) Click the Options (
 ) icon to display the Note Options window and customize the note display options as necessary. ) icon to display the Note Options window and customize the note display options as necessary.
- Click Close to close the Applying Ins. Payment window.
Payments that are fully allocated display in black text while those that are partially allocated display in green text.
Manage EOB Information
An Explanation of Benefits (EOB) about a claim is returned from the insurance company along with the insurance payment.
Important: How the EOB is received depends on whether your institution uses the EDI Remittance module. If not using the module, the EOB is received along with the payment and you must manually add the EOB details to each treatment. If using the module, the EOB details are included in the 835 file and are added automatically to each applicable treatment. However, if any payments are identified as an exception, they cannot have the EOB details added automatically. You must still enter the EOB details manually.
An EOB uses claim adjustment reasons and remittance advice remarks to explain the logic behind why specific payment amounts were sent for each treatment on the claim. The information included in an EOB may also be used to create secondary EDI insurance claims and for general reporting purposes. When allocating insurance payments to treatments, you can view, enter, and link any EOB details associated with the treatment. When necessary, you can also edit the EOB information.
Example: In some cases, such as adjudication reversals, new information made be made available after the fact and you may need to modify the original EOB to reflect these changes so that accurate information is provided for secondary claims and reporting.
Claim adjustment reasons are standardized HIPAA X12N codes that explain why a claim was adjusted and not paid in full. Remittance advice remarks are standardized HIPAA X12N codes that give further explanation comments from the insurance carrier on how a claim is adjudicated.
To manage EOB information:
-
Open the Applying Ins. Payment window and allocate the insurance payment using your usual workflow.
-
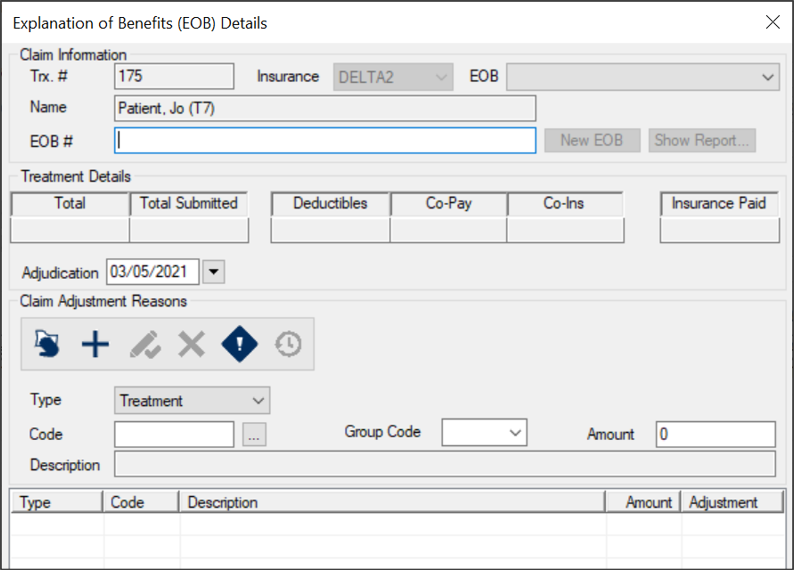
Select the appropriate treatment line and click EOB… to display the Explanation of Benefits (EOB) Details window.
Note: The EOB… button is only enabled once you apply the insurance payment to the selected record or if it already has an EOB attached.
- To view an existing EOB, review the Claim Information, Treatment Details, and Claim Adjustment Reasons sections as necessary.
Tips:
-
If there are multiple EOB records on the treatment, select a listed EOB record from the EOB drop-down to view another record.
-
To view the history of claim adjustment reason, select a listed reason and click the Show History (
 ) icon. ) icon.
- To add a new EOB record:
- If necessary, click New EOB.
Note: The New EOB button is only enabled if other EOB records are present.
- Complete the Claim Information fields as necessary.
| Trx. # |
This read-only field displays the axiUm-generated claim number that was assigned when you created this claim.
|
| Insurance
|
This read-only field indicates the name of the insurance company associated to this patient.
|
| EOB
|
This field allows you to select a listed date record to view the EOB details.
When adding a new record, ignore this field.
|
|
Name |
This read-only field displays the name of the patient associated to this EOB.
|
| EOB # |
Enter the reference number for tracking this EOB.
|
- Review the Treatment Details section.
- If necessary, select another Adjudication date from the calendar drop-down.
- To add a claim adjustment reason:
-
Click the Clear Data (
 ) icon. ) icon.
-
Complete the fields as necessary and click the Add a new Record (
 ) icon. ) icon.
| Type |
Select a type from the drop-down:
- Claim: Indicates this adjustment reason record applies to the entire claim.
- Treatment: Indicates this adjustment reason record applies only to the selected treatment.
|
| Code |
Enter the claim adjustment reason code or click the ellipsis to select from the Claim Adjustment Reason Codes window.
|
| Description |
This read-only field displays the description associated with the selected claim adjustment reason code.
|
|
Group Code |
Select a code from the drop-down. |
| Amount |
Enter the adjustment value.
|
- To perform another task, complete any of the following:
Delete Claim Adjustment Reasons
-
Select a listed claim adjustment reason and click the Delete Record (
 ) icon. ) icon.
- When prompted, click Yes to confirm your deletion.
Add Remittance Advice Remarks
Remittance advice remark codes are standardized HIPAA X12N codes that give further explanation comments from the insurance carrier on how a claim is adjudicated.
-
Select a listed claim adjustment reason and click the Claim Remittance Advice Remarks (
 ) icon to display the Claim Remittance Advice Remarks window. ) icon to display the Claim Remittance Advice Remarks window.
-
Enter the claim remittance advice remarks code or click the ellipsis to select from the Claim Remittance Remarks Codes window.
Note: If necessary, you can also edit and delete remittance advice remarks using the applicable icons.
Manage Balance Transfers/Write Offs
When allocating an insurance payment that does not match the amount submitted, the remaining treatment balance must be handled in one of three ways: transferred back to the patient, transferred to another insurance, or be written off.
Tip: If necessary, you can complete a combination of these tasks. The Balance field should display 0.00 when you apply all transfers and write offs.
Important: If insurance overpaid, you need to rebill the treatment.
In the cases where an insurance company sends back a $0 payment for a claim or includes a treatment that they paid $0 for, the balance on the claim must be dealt with after the payment is added. Depending on the situation, the balance may be transferred to a secondary or tertiary insurance coverage, transferred to the patient, or written off by the institution.
To manage balance transfers and write offs:
-
Open the Applying Ins. Payment window and allocate the insurance payment using your usual workflow.
-
Select a listed treatment/charge and modify the Apply field to the amount being paid by the insurance company.
Tip: If not covered at all, enter 0.00.
-
Complete any of the following:
Note: If necessary, you can complete multiple tasks at once using both drop-downs and the associated fields.
Example: The claim is for $100 and the insurance company sends back a payment for $80. You want to transfer $10 of the charge back to the patient and write off the remaining $10.
Tip: After you set a Reason, you should modify the Description field to include the EOB denial explanation.
Transfer Balances to Patients
-
From the drop-down field, select Transfer and in the applicable text field, enter the dollar amount you are transferring.
-
Click the Reason ellipsis to select a reason from the Adjustment Codes window.
-
From the Transfer To drop-down field, select Patient.
-
Confirm the Balance field displays 0.00 and click Apply.
Transfer Balances to Secondary/Tertiary Insurance
-
From the drop-down field, select Transfer and in the applicable text field, enter the dollar amount you are transferring.
-
Click the Reason ellipsis to select a reason from the Adjustment Codes window.
-
From the Transfer To drop-down field, select Insurance.
-
Confirm the Balance field displays 0.00 and click Apply.
- When prompted with the Bill Secondary Policy Question to create the claim for the next insurance policy to be billed, click Yes.
Write Off Balances
-
From the drop-down field, select Write Off and in the applicable text field, enter the dollar amount you are writing off.
-
Click the Reason ellipsis to select a reason from the Adjustment Codes window.
-
Confirm the Balance field displays 0.00 and click Apply.
Adjust Insurance Payments
When necessary, you can adjust an insurance payment using one of several adjustment methods directly from the Ins Pmt tab:
Refund Insurance Payments
When necessary, you can refund part of or an entire insurance payment from both sub-tabs in the Ins Pmt tab.
- Open the Transactions module and click the Ins Pmt tab > Ins. Payments sub-tab.
- Search for and select the insurance company.
Note: The full list displays if the Load all Ins. companies in list checkbox is selected in the Transaction Options window > Payment Options section. For information, see Customize Transactions.
-
Enter the first character(s) of the company you are searching for based on the column headings and click the applicable heading to sort.
Tip: You can enter an underscore (_) to display all results within the column.
Note: You can select the Include Inactive checkbox to include inactive insurance companies in the search.
-
Select a listed insurance company.
-
Review the listed payments.
-
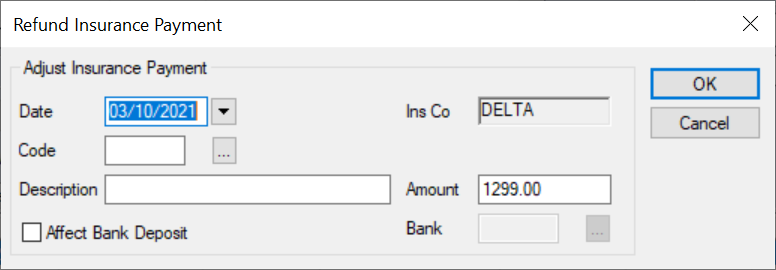
Select a listed payment, right-click and select Refund Payment or Refund OverPayment to display the Refund Insurance Payment window.
Note: The Refund Payment right-click option is only available from the Ins. Payments sub-tab and the Refund OverPayment right-click option is only available from the Ins. Payments for Patient sub-tab.
-
Complete the fields as necessary and click OK.
| Date |
This defaults to the current date.
If necessary, select another date from the calendar drop-down.
|
| Code
|
Enter the adjustment code or click the ellipsis to select from the Adjustment Codes window.
|
| Description
|
This field displays the description of the adjustment code.
Note: If necessary, you can modify the description manually.
|
|
Affect Bank Deposit |
Select the checkbox if this adjustment affects the bank deposit and will display on the next bank deposit report opposite the record(s) being adjusted.
Note: If selected, the Bank field is enabled.
|
| Amount |
Enter the portion of the insurance payment you want to refund.
|
| Bank |
Note: This field is only enabled if the Affect Bank Deposit checkbox is selected.
Enter the bank code that identifies where the payment was processed or click the ellipsis to select from the Bank Codes window.
|
Reverse Insurance Payments
- Open the Transactions module and click the Ins Pmt tab > Ins. Payments sub-tab.
- Search for and select the insurance company.
Note: The full list displays if the Load all Ins. companies in list checkbox is selected in the Transaction Options window > Payment Options section. For information, see Customize Transactions.
-
Enter the first character(s) of the company you are searching for based on the column headings and click the applicable heading to sort.
Tip: You can enter an underscore (_) to display all results within the column.
Note: You can select the Include Inactive checkbox to include inactive insurance companies in the search.
-
Select a listed insurance company.
-
Review the listed payments.
-
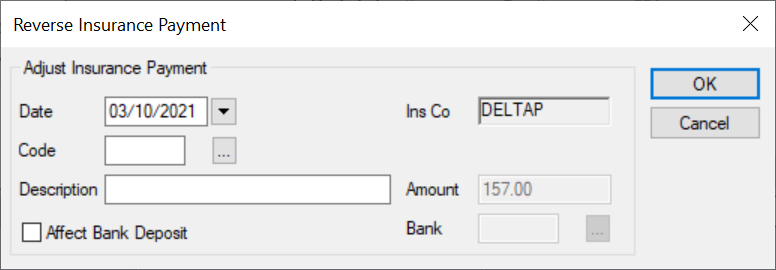
Select a listed payment, right-click and select Reverse Payment to display the Reverse Insurance Payment window.
-
Complete the fields as necessary and click OK.
| Date |
This defaults to the current date.
If necessary, select another date from the calendar drop-down.
|
| Code
|
Enter the adjustment code or click the ellipsis to select from the Adjustment Codes window.
|
| Description
|
This field displays the description of the adjustment code.
Note: If necessary, you can modify the description manually.
|
|
Affect Bank Deposit |
Select the checkbox if this adjustment affects the bank deposit and will display on the next bank deposit report opposite the record(s) being adjusted.
Note: If selected, the Bank field is enabled.
|
| Amount |
This field displays the payment amount.
|
| Bank |
Note: This field is only enabled if the Affect Bank Deposit checkbox is selected.
Enter the bank code that identifies where the payment was processed or click the ellipsis to select from the Bank Codes window.
|
Reverse Insurance Adjudications
An adjudication is the process of paying or denying submitted claims after comparing a claim to the patient’s coverage. In some cases, an insurance company may pay for a treatment, then reverse their adjudication, choosing to recoup part or all of a previous payment using a subsequent EOB.
Example: An insurance company realizes they made a mistake and overpaid for a treatment or paid for a treatment that should not have been covered. Because they cannot modify the payment they sent before, when they next send a payment, the EOB indicates they have corrected their mistake by making this latest payment less, allowing them to recoup their previous overpayment.
If an insurance company reverses an adjudication, the insurance payment that was previously allocated in axiUm is now less by the designated amount of money and your institution is now short that amount of money. You must correct the insurance payment to adjust the patient's record manually. This removes that designated amount from the previous payment and adds the amount to the current payment so that the whole allocation balances.
Tip: You should record the reason an insurance payment was reversed using a patient note. This will help explain the current financial status of the record.
To reverse an insurance adjudication:
- Open the Transactions module and click the Ins Pmt tab > Ins. Payments sub-tab.
- Search for and select the insurance company.
Note: The full list displays if the Load all Ins. companies in list checkbox is selected in the Transaction Options window > Payment Options section. For information, see Customize Transactions.
-
Enter the first character(s) of the company you are searching for based on the column headings and click the applicable heading to sort.
Tip: You can enter an underscore (_) to display all results within the column.
Note: You can select the Include Inactive checkbox to include inactive insurance companies in the search.
-
Select a listed insurance company.
-
Review the listed payments.
-
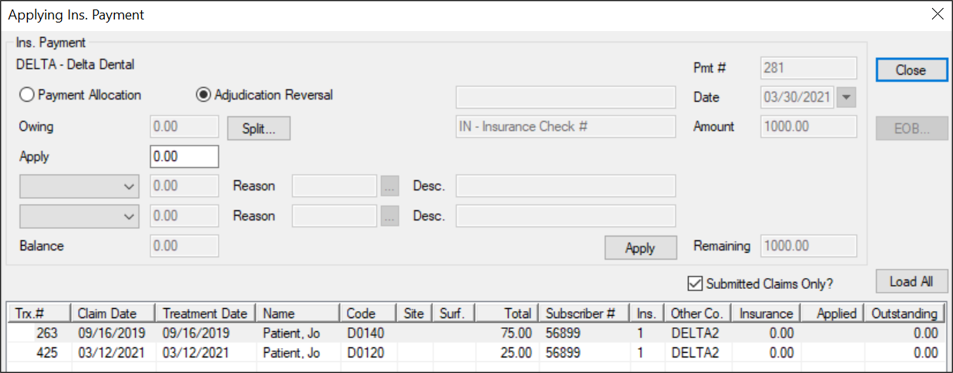
Select a listed payment and click Pt. Allocate… to display the Applying Ins. Payment window.
-
Click Load All.
-
Select the previously paid treatment/charge and select the Adjudication Reversal radio button.
-
Modify the Apply field to the amount being recouped.
-
If necessary, transfer the balance to clear the balance owing on the claim.
Tip: You can leave a balance if a future payment is expected from the insurance company or the claim is in dispute.
-
From the drop-down fields, select Transfer, Write-off, or Write-off credit to deal with the recouped amount.
Note: Depending on the circumstances, you may need to use one or both drop-down fields.
-
In the applicable text field, enter the amount you are transferring or writing off.
-
Click the Reason ellipsis to select a reason from the Adjustment Codes window.
-
Click Apply.
Important: If the amount does not match any previous allocation amounts for this treatment and insurance company, a warning message displays. Click Yes or No as necessary.
The recouped amount displays in the Applied column as a negative amount next to the treatment/charge(s).
-
Click EOB… to display the Explanation of Benefits (EOB) Details window.
Note: This button is only enabled if the selected record has an EOB attached automatically to it via the EDI Remittance module or if you have already allocated an insurance payment to the record.
-
Review or add the EOB information as necessary.
-
Click Close to close the Applying Ins. Payment window.
The insurance payment displays in green text to indicate it is no longer fully allocated. There is now an increase in the amount of funds that can be allocated to other treatments on the EOB.
Manage Insurance Adjustments
- Open the Transactions module and click the Ins Pmt tab > Ins. Payments sub-tab.
- Search for and select the insurance company.
Note: The full list displays if the Load all Ins. companies in list checkbox is selected in the Transaction Options window > Payment Options section. For information, see Customize Transactions.
-
Enter the first character(s) of the company you are searching for based on the column headings and click the applicable heading to sort.
Tip: You can enter an underscore (_) to display all results within the column.
Note: You can select the Include Inactive checkbox to include inactive insurance companies in the search.
-
Select a listed insurance company.
-
Review the listed payments.
-
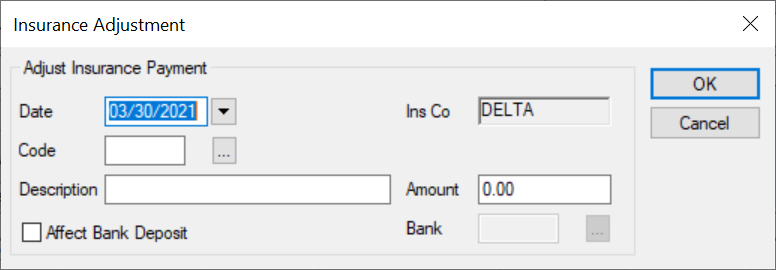
Select a listed payment, right-click and select Insurance Adjustment to display the Insurance Adjustment window.
-
Complete the fields as necessary and click OK.
| Date |
This defaults to the current date.
If necessary, select another date from the calendar drop-down.
|
| Code
|
Enter the adjustment code or click the ellipsis to select from the Adjustment Codes window.
|
| Description
|
This field displays the description of the adjustment code.
Note: If necessary, you can modify the description manually.
|
|
Affect Bank Deposit |
Select the checkbox if this adjustment affects the bank deposit and will display on the next bank deposit report opposite the record(s) being adjusted.
Note: If selected, the Bank field is enabled.
|
| Amount |
Enter the portion of the insurance payment you want to adjust.
|
| Bank |
Note: This field is only enabled if the Affect Bank Deposit checkbox is selected.
Enter the bank code that identifies where the payment was processed or click the ellipsis to select from the Bank Codes window.
|
Manage Insurance Payments
- Open the Transactions module and click the Ins Pmt tab > Ins. Payments sub-tab.
- Search for and select the insurance company.
Note: The full list displays if the Load all Ins. companies in list checkbox is selected in the Transaction Options window > Payment Options section. For information, see Customize Transactions.
-
Enter the first character(s) of the company you are searching for based on the column headings and click the applicable heading to sort.
Tip: You can enter an underscore (_) to display all results within the column.
Note: You can select the Include Inactive checkbox to include inactive insurance companies in the search.
-
Select a listed insurance company.
-
Review the listed payments.
-
To perform another task, complete any of the following:
Add Attachments to Insurance Payments
When necessary, you can add attachments to an insurance payment.
Example: You may need to add the EOB to a payment.
-
Select a listed record.
- Right-click and select Add Attachment to display the Add Attachment (Ins Pmt) window.
-
Complete the fields as necessary and click OK.
Tip: This defaults to the name of the file being attached.
- Description: Enter the description of the file being uploaded.
- Attachment: Click the ellipsis to select the file you want to attach to the payment.
Note: If you need to scan a paper document, you can click the Scan to File… button to open your scanning software and scan the document.
Edit Insurance Payments
In the case of a small error when adding an insurance payment, you can edit the payment.
Example: The wrong code or amount was entered.
Note: Payments that have already been allocated must be unallocated before they can be edited.
-
Select a listed payment.
- Modify the fields as necessary and click Modify.
Delete Insurance Payments
In extreme cases, you can delete an insurance payment.
Warning: We do not recommend deleting insurance payments.
Note: Payments that have already been allocated or adjusted must be unallocated and/or unadjusted before they can be deleted.
-
Select a listed payment and click Delete.
-
When prompted, click Yes to confirm your deletion.
Unallocate Insurance Payments
Tip: If the value in the Applied column is higher than 0.00, the money has been partially or fully allocated.
-
Select a listed payment, right-click and select Disbursement to display the Insurance Disbursement window.
- Select a record and click Unallocate.
-
Repeat Step b as necessary.
- Click Close.
|